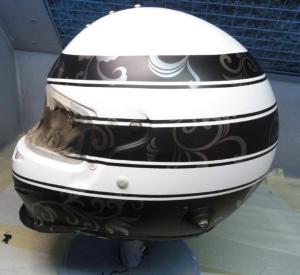
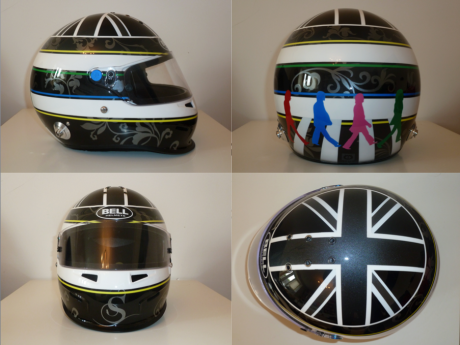
The helmet. It’s probably the most recognisable part of a racing driver inside the cockpit of a racing car. Just as superheroes have their own uniforms that identify them, so are our racing heroes instantly recognisable by the design of the most important part of modern day safety equipment.
Although we’re now in an era of drivers changing their designs on an almost weekend by weekend basis, the basic design will, mostly, stay the same. But we all remember the classics, we all remember the ones we grew up with. The ones that we spent hours scribbling on school notebooks. For me, it was Ayrton Senna’s helmet. I don’t think a single school book avoided the yellow, green and blue of my hero’s helmet design.
But, if you were anything like me, you didn’t just draw your hero’s helmet on your school books. I used to spend hours designing my own helmet… just in case one day I might ever get the chance to race myself.
Well, aged 30, I finally decided to bite the bullet and make all those schoolboy dreams come true. My own helmet… the one I’d been dreaming of since I was a kid.
But you can’t just get your paint kit out and have a stab at it. Painting a race helmet is a skilled job. I had a search online, and found an artist whose designs I liked, and got in contact. Nick O’Neill runs a company called Demon Designs, and he was more than happy to slot my ideas into an already busy schedule.
“I’ve always been an artist,” says Nick, “but I’ve always been around racing and I raced motocross myself and wanted to paint my own helmet so I learnt how to do it myself. Once I’d done one friends saw it and it all went from there.
“The process for a helmet starts with a general idea. Some people have a concept in mind of a whole design, while others will simply have a colour or a theme in mind and then we’ll work on that, shooting ideas back and forward until we hit something we’re happy with. That can take anywhere from a week if somebody has a very clear idea, up to a month. Obviously getting a helmet painted isn’t cheap so they’ve got to be sure they’re happy with absolutely every part of it. I think the strangest thing I got asked to paint was a deep sea driver on the top of a helmet once, but anything is possible. The only thing that I can’t do right now is chrome because I don’t have the technology here to do that. Other than that, if I can physically paint it, I will.”
Thankfully for Nick, I’ve had a helmet design in my head for years. The concept was simple. I wanted a predominantly black helmet, with white stripes to imitate the design my hero Senna had worn. But I quite wanted some pinstripes to reflect the colours of Ayrton’s helmet, in tribute. At the top, I wanted a Union Flag, as I’m quite a proud Brit, but in blacks, silvers and greys. At the back, I wanted a tribute to my other heroes, The Beatles. I suggested the concept of the Abbey Road front cover, but in silhouettes, with each silhouette in the colour of the outfit that each Beatle had worn on the cover of Sgt Peppers (GEEK ALERT.) And on the chin bar, I wanted something for my daughter, Sophie. And sticking with the Beatley vibe, I asked for some swirly psychedelic flowery bits, too.
Nick had a think, and within a week had sent me through a number of different designs. We ironed out a few small creases, and in no time at all we had a design we were happy with.
I packed up my Bell RS3, and shipped it off to Nick.
Once I take delivery of a helmet, the first thing you have to do is prep the helmet by stripping it down to the shell, taking off the foam, the visor, vents etc. If it is used sometimes there are small stone chips to flatten out, but more often than not you are working with a brand new helmet, gloss white, and with the paints we use it doesn’t need a primer.
With your design the first thing that I did was to mask off the areas that would remain white, so the two main stripes, the pinstripes and the circle on the top for the Union Flag. From there, the first colour to go down was the grey/blue/silver metallic colour for the flowery designs.
The actual painting itself doesn’t take that long. That’s the funny thing. It’s the masking that takes the time. Airbrushing is probably only 20% of the total time. The masking and allowing to dry is what takes up the time.
So after the silver had dried, the next stage was to cut out the flowery designs on a paint resistant vinyl, after which the black was sprayed over the top. When they’re taken off the silver pieces look like they’re under the black.
Getting straight lines around the curve of a helmet are pretty tough. They’re actually some of the most difficult things you can be asked to do because a helmet isn’t round, it is egg shaped. I’ve machined my own tool that helps me to draw the straight lines around a curve.
The colours are the next part of the process. When all the masking had come off, we were left with the white lines and pinstripes, so the yellows, blues and greens were remasked and sprayed, and then it was the zebra crossing and the figures.
The total time from receiving the helmet to the finished article is hard to compute. You’re waiting for things to dry for a long time, but in terms of man hours it is about two days of masking and painting… 48 hours… but a lot of that is waiting. The job, start to finish, it’s around a week in terms of actual days spent. At the end I’ll clear coat it, too, and that takes another 24 hours to dry, which I’ll send off to have done.
Then we just have to reassemble the helmet, get it packed up safely and send it back to the customer, ready to use.
The box arrived with me the next day, and I have to say I am absolutely delighted with the result. A childhood dream come true. Now all I have to do is pass my race license.
With huge thanks to Nick O’Neill @ Demon Designs
Find him at www.demondesigns-uk.com


Nice to see I wasn’t the only one who designed their helmet on school book for the day Ron or Frank asked me to race for them…
Thing is…I’m 30 and I’ve never grown out of it. Eyeing up karting with CovKart next year so like you…I have an excuse now. That’s some great work there….how much did it cost?
Hi Adie. Obviously all prices are individually costed up based on design and paint process, but I will tell you that Nick came in considerably more affordable than the vast majority of UK-based helmet artists that I found. I’m delighted with the result. Great guy, fabulous artist, and, from my experience, won’t rob you blind.
Hi Adie, I actually race with Covkart and I know that the
owner of the series actually runs his own helmet design business. I
haven’t had mine done but quite a lot of other racers have, so that
could be another option. 🙂
Wow that’s a really cool thing to do. I would love to design my own helmet and get it painted up, though maybe first I need to start racing!
One of my favourite helmets was the one that Juan Pablo Montoya had at the Brazilian GP in 2005 as a one off. I remember that it had a picture of a road on it which for some reason I really liked and found funny. Then he went on to win the race!
Nice story Will!
Interesting to see the process as it takes place.
By the way excellent design!! Wear it with pride!!
Congratulations Will! That must have been such a great day when you received the helmet.
Fantastic article, and absolutely brilliant design. I’m
Australian, and hate the Beatles with a passion normally reserved
for Justin Bieber, but that helmet is stunning. Current F1 drivers
should take note.
[…] Und noch was für die Künstler unter uns: Ein Bericht
über das Helmdesign in der F1 von Will Buxton. […]
[…] The art of helmet design (Will Bucton) […]
Awesome design, Nick! ‘love the pre-race pit walk
enthusiasm, also! Great story on the helmet…please do more – we
don’t get enough of the inside F1 stuff like this. Perhaps a story
on what an F1 mechanic does with his free time- there must be some
that are avid model builders, for example… Take it easy!,
Kirk
Sorry Will! It’s late here in Seattle! …. Didn’t mean to
call you Nick Keep up the great work- maybe you can use your helmet
in a special RedBull ride like Tom got! Best Wishes, Kirk
Great article, Will, and I’n familiar with your voice for
the GP2 and GP3 race coverage I get on Star Sports in India. If u
visit India you’ll notice many strange helmet shapes motorcycle
riders use here. I have 5, but they cost less than a quarter of the
European, Japanese and American helmets. I’ve designed the livery
on one of them too. I’m an avid helmet and I’ve always liked Arai’s
design (though I’ve never been able to own one). It is simple and
cool – I find Bell too fluidic. But your livery is awesome! Great
talent u and Nick have! Perhaps being an insider u could shed light
on this. What is the strange carbon fibre piece all Bell F1 drivers
have attached on top of their visors this season? Looks pretty
ugly.
[…] Race car drivers tend to have little input into how their cars look. The only real thing they do have a say over is their helmet. Here’s how your typical helmet gets designed and painted. (The Buxton Blog) […]
motorcycle engine repair…
[…]The art of helmet design « The Buxton Blog[…]…
Awesome mate! You are definitely not alone in designing your own helmet ‘in case’ – I remember doing it as a teenager (and still have the designs to prove it) and I still get ideas now…. at 41. I have/had a kart licence and always wanted to get my lid painted up, but every penny went into keeping the kart running (largely unsuccessfully)… One day, though, one day….
Great article and what a fantastic helmet!!! Ten years ago I raced an old gray-market BMW323i and though an open-wheel F1 fan at heart, I loved the tin tops and following BTCC and other series and the resurgent sports car scene in the US (thanks ALMs).
Got into airbrushing in order to paint my own helmet and those of others. I’ve enjoyed painting practice helmets and it was fun to see my own design come to life by my own hands. I don’t do this on a professional level so this isn’t some plea for business, just a shared comment on helmet design and racing dreams.